
If you’re a devoted Disney fan, you know there’s a unique enchantment that comes with celebrating the magic of Disney. Whether you’re planning an unforgettable trip to Disneyland or Walt Disney World, or simply wish to infuse a bit of pixie dust into your everyday life, these captivating Disney DIY crafts are designed just for you. Get ready to unleash your inner artist and create personalized, wearable treasures and exciting accessories that showcase your love for all things Disney. From iconic character ears to unique themed jewelry and custom apparel, these projects offer a fantastic way to prepare for your next magical adventure or simply keep the spirit of Disney alive, even when you’re at home. Ditch the generic souvenirs and craft something truly special that reflects your unique style and passion for the happiest place on Earth!
Magical DIY Disney Crafts: Create Your Own Wearable Wonders & Trip Essentials
The anticipation of a Disney vacation is an experience in itself, filled with dreams of thrilling rides, enchanting parades, and beloved characters. What better way to amplify that excitement and add a personal touch to your journey than by crafting your very own Disney-inspired gear? These DIY projects are not only fun to make but also offer a budget-friendly alternative to store-bought merchandise. Imagine strolling through the park wearing a unique creation made with your own hands, receiving compliments, and knowing you’ve brought a piece of Disney magic to life. Let’s dive into six fantastic Disney crafts that will make your next adventure even more memorable.
6 Enchanting DIY Disney Crafts You Can Make and Wear (or Use!)
Prepare to be inspired! These DIY Disney crafts are perfect for adding a personalized flair to your park outfits, gifting to fellow Disney enthusiasts, or simply enjoying the creative process at home. Each project is designed to be accessible and rewarding, ensuring you’ll love the results.
1. DIY Disney Little Mermaid Ears: Dive into Ariel’s World

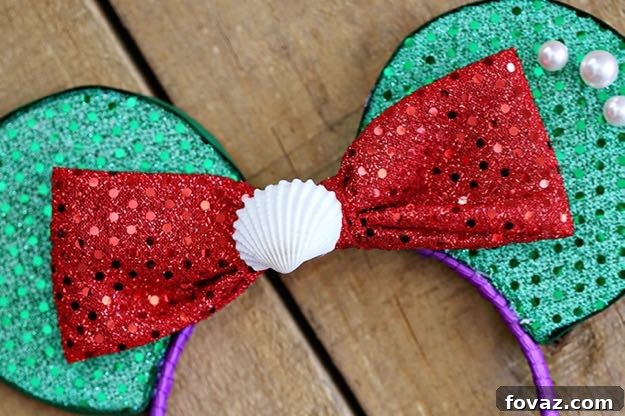
If you or a special someone adores the vibrant underwater world of Ariel and her friends, these DIY Little Mermaid ears are an absolute must-make! They offer a delightful way to showcase your devotion to this classic Disney princess and will undoubtedly make a splash at the parks. This project allows for beautiful customization, letting you capture the essence of the ocean with shimmering fabrics and charming embellishments. Find more inspiration and details at SeeVanessaCraft.com.
What You Will Need To Make Your Enchanting Little Mermaid Headband
- A sturdy Headband
- Purple Ribbon (wide enough to cover the headband comfortably)
- Hot Glue Gun and glue sticks
- Foam Board (for sturdy ear shapes)
- X-acto Knife (with adult supervision, if needed)
- Red Sequin Fabric (for a touch of Ariel’s tail or a bow)
- Green Sequin Fabric (to mimic the shimmering scales)
- Sharp Scissors
- Spray Adhesive (for smooth fabric application)
- Green Ribbon (to neatly cover seams)
- Assorted Pearls (for a nautical, elegant touch)
- A decorative Seashell or two
Step One: Prepare Your Headband Base
Begin by wrapping your chosen headband entirely with the purple ribbon. Ensure the ribbon is wrapped tightly and smoothly, with no gaps. Use a hot glue gun to secure both ends of the ribbon and any overlaps, creating a clean and comfortable base for your ears.
Step Two: Crafting the Ear Templates
Download and print a Mickey Ear Template from Disney Family. Carefully cut out the ear shapes from the template using your scissors. These will serve as the guide for your Little Mermaid ears.
Step Three: Customizing for a Perfect Fit
Lay your wrapped headband flat on a surface. Position the paper ear templates underneath the headband, spaced a couple of inches apart (for adults, approximately 2 inches; for children, about 1 inch). Trace the curvature of the headband onto the bottom of each ear template and carefully cut out this half-moon shape. This ensures your ears will sit perfectly flush against the headband when glued.
Step Four: Creating Sturdy Foam Ear Bases
Trace the adjusted ear template onto the foam board four times. Using an X-Acto knife, meticulously cut out these four foam ear shapes. Always exercise extreme caution when using a sharp knife.
Step Five: Preparing the Sequin Fabric Covers
Trace the ear template onto the green sequin fabric twice. When cutting, make sure to cut slightly larger than the trace line, allowing for a small overlap to ensure full coverage around the foam board edges.
Step Six: Assembling the Ear Thickness
Using your hot glue gun, firmly glue two layers of foam board together for each ear. You will now have two sturdy ear pieces, each composed of two foam board layers.
Step Seven: Applying the Shimmering Sequin Fabric
Apply spray adhesive to one side of one foam ear. Carefully position and wrap the green sequin fabric around this side, gently overlapping the edges to the back. Repeat this process for the other side of the same ear, and then for both sides of the second ear. Ensure the fabric is smooth and free of wrinkles.
Step Eight: Neatly Finishing the Edges
To give your ears a polished look, wrap the green ribbon around the side edges of each sequin-covered ear. This will beautifully conceal any fabric “seams.” There’s no need to wrap ribbon around the bottom, half-moon part, as this will be glued to the headband.
Step Nine: Securing the Ears to the Headband
Using your hot glue gun, carefully attach the fabric-covered ears to the ribbon-wrapped headband, maintaining the desired spacing (1-2 inches apart). Press and hold each ear firmly for about 30 seconds to allow the glue to cool and set securely.
Step Ten: The Final Magical Touches
Now for the fun part! Decorate your Little Mermaid ears with the red sequin fabric to create a bow, a playful fin, or other accents. Adorn them with pearls and seashells to truly capture the essence of the ocean. Get creative and make them uniquely yours!

If you’re enchanted by the Little Mermaid, you’ll also adore this delightful craft project for a princess-themed room!
2. DIY Disney Cricut Jewelry: Wear Your Disney Heart on Your Sleeve (or Ears!)

Elevate your Disney style with custom-made jewelry that perfectly complements your favorite Disney t-shirts and Mickey ears. These adorable earrings, created using a Cricut machine, offer endless possibilities for personalization. Imagine wearing tiny Mickey heads adorned with rainbow art, making a subtle yet magical statement. This craft is fantastic for adding a unique accessory to your park day outfit or as a charming gift for a fellow Disney enthusiast. Discover more details and source supplies at 100Directions.com.
What You Will Need to Make This Charming Disney Jewelry
- Cricut Cutting Machine (Explore, Air, or Explore One)
- Cricut Design Space free online software
- Disney Mickey head cut file (image #M4008B) – a custom layout for this design might already be available to kickstart your project.
- Heart shape cut file (from Design Space)
- Printable shrink plastic sheets
- Rainbow Art page (designed by Jen Goode, available for download on the source site)
- Parchment paper, a cookie sheet, and hot pads for baking
- Jewelry findings for earrings (e.g., hooks and jump rings)
- Jewelry pliers
- Sealer (optional but highly recommended for durability and shine)
To Create the Mickey Heart Design in Cricut Design Space:
- Select the Mickey Head: Start by choosing the outlined Mickey head design from the Cricut design library.
- Ungroup the Design: If the design is grouped, ungroup it to work with individual layers.
- Refine the Mickey Shape: Click on “Contours” and deselect the inside circles of the Mickey design. This action will transform the Mickey head into a solid, unified shape, perfect for your base.
- Add a Heart Shape: From the “Shapes” menu on the left side of Design Space, select and add a heart shape to your canvas.
- Slice the Heart into Mickey: Position the heart precisely in the center of the solid Mickey head. Select both the Mickey head and the heart, then click the “Slice” tool. This will cut the heart shape out of the Mickey head, leaving you with a Mickey shape with a heart cutout and a separate heart shape. Hide the separate heart by clicking the eye icon on the layer palette.
- Create the Jewelry Loop: Repeat step #5, but this time use a small circle shape to slice a tiny hole near the top of each Mickey ear. This hole will be where your jump ring and earring hook attach, transforming your design into wearable jewelry.


Step One: Download Your Art
Head over to the hyperlinked site mentioned above to download the vibrant rainbow art designed by Jen Goode. This will be the colorful base for your jewelry.
Step Two: Print onto Shrink Plastic
Load your printable shrink plastic into your printer and print the downloaded rainbow art onto it. Ensure you’re using the correct side of the plastic for printing, typically the rougher, matte side.
Step Three: Aligning Your Cuts in Cricut Design Space
Open Cricut Design Space and set up the Mickey heart cutting design you created earlier. Carefully measure the placement of the color blocks on your printed shrink plastic. Then, align your cutting designs on the virtual mat in Design Space to match these measurements, ensuring each Mickey head gets the desired rainbow section.
Step Four: Precision Cutting with Your Cricut
Shrink plastic requires a bit more care during cutting. Adjust your Cricut machine settings for multiple passes. A good starting point is 3 cuts at the “cardstock” setting, followed by 2 cuts at the “poster board” setting. Once cut, carefully remove the intricate pieces. A weeding tool can be very helpful here, but be gentle to avoid tearing the plastic.
Step Five: The Shrinking Transformation
Preheat your oven according to the shrink plastic instructions. Place your plastic cutouts on a cookie sheet lined with parchment paper. Bake for approximately 5-10 minutes. Watch closely: the plastic will curl, then flatten out and shrink significantly. You’ll know it’s finished when it’s no longer bent, is much smaller, and completely flat. Remove from the oven with hot pads and allow to cool completely.
Step Six: Assembling Your Disney Earrings
Once cooled, use your jewelry pliers to open the jump rings. Thread a jump ring through the small hole you created in each shrunk Mickey head, then attach an earring hook to the jump ring. Close the jump rings securely.
Step Seven: Optional Sealer for Durability and Shine
For a professional finish and added durability, apply a sealer to both sides of each earring. Products like Decoart’s Triple Thick are excellent, as they dry to a high-shine, resin-like finish, making your earrings look truly exquisite and long-lasting.
3. DIY Disney Bleached Out Shirt: Custom Family Apparel

Why settle for mass-produced Disney shirts when you can create a personalized, matching set for your whole family? Crafting your own bleached-out Disney shirts is a fantastic way to bond, save money, and ensure everyone looks cohesively stylish for your trip. These custom shirts not only make for great photos but also help keep an eye on younger family members in crowded parks, as matching outfits are easily spotted!
What You Will Need for Your Custom Disney Bleached Out Shirt
- Plain t-shirts (darker colors work best for contrast)
- Freezer paper
- An iron
- A Mickey Mouse (or other Disney character) template
- A spray bottle
- Household bleach
- A pencil
- Cardboard (to place inside the shirt)
If you’re looking for a Mickey Mouse template, you can find a suitable one here: mouse templates | teachmama.com
Step One: Select and Print Your Design
Print out the Disney character template you wish to use. Mickey Mouse is a classic choice, but feel free to choose any character that captures your family’s imagination.
Step Two: Trace onto Freezer Paper
Place your freezer paper (shiny side down) over your printed template. Using a pencil, carefully trace the outline of your chosen image onto the matte side of the freezer paper.
Step Three: Cut Out Your Stencil
With sharp scissors, meticulously cut out the traced image from the freezer paper. This will create your stencil.
Step Four: Iron the Stencil onto the Shirt
Position the freezer paper stencil, shiny side down, onto the t-shirt in your desired location. Using a warm iron (without steam), press the stencil firmly onto the fabric. The shiny side of the freezer paper will temporarily adhere to the shirt, creating a crisp barrier for bleaching.
Step Five: Prepare Your Bleach Solution
In your spray bottle, mix a solution of approximately 60% bleach and 40% water. This dilution helps control the bleaching process and reduces the risk of damaging the fabric.
Step Six: Protect the Back of the Shirt
Slide a piece of cardboard inside the t-shirt, directly underneath your stencil. This prevents the bleach from seeping through to the back of the shirt.
Step Seven: The Bleaching Process
Evenly spray the bleach solution over the stencil area. Watch carefully as the fabric lightens. The longer the bleach sits, the lighter the design will become. For a subtle effect, spray lightly; for a more dramatic contrast, spray a bit more. Avoid oversaturating the fabric.
Step Eight: Carefully Remove the Stencil
Once you’re satisfied with the bleached effect, gently peel off the freezer paper template from the shirt.

Step Nine: Rinse and Dry
Allow the shirt to dry completely for a short period, then thoroughly rinse it under cold water to stop the bleaching action. Hang the shirt to air dry or tumble dry on a low setting. Your custom Disney shirts are now ready to wear!
4. DIY Disney Princess Duct Tape Hand Mirror: A Royal Accessory

While gathering souvenirs at Disney parks is always a joy, imagine bringing your own personalized magical item with you! This enchanting DIY Disney Princess duct tape hand mirror is a perfect example. Not only is it a practical accessory for quick touch-ups, but it’s also a charming, unique piece that reflects your inner royalty. Plus, it’s an incredibly simple and affordable project! Find more details and inspiration at DollarStoreCrafts.com.
What You Will Need
- A simple Hand mirror (often found for around $1)
- Patterned duct tape, preferably Disney Princess themed (available on Amazon or craft stores)
- Sharp Scissors
- Ribbon (optional, for an extra decorative touch)
Step One: Cover the Mirror’s Back
Begin by covering the entire back of the hand mirror with overlapping strips of your Disney Princess duct tape. If your tape has a continuous pattern, try to match it up for a seamless look. Ensure you leave about 1 inch of duct tape overlapping around the sides of the mirror for later wrapping.
Step Two: Trim Excess Tape from Mirror Edge
Carefully trim the overlapping duct tape around the circular edge of the mirror. Aim for an even distance, creating a neat border around the mirror’s reflective surface.
Step Three: Adorn the Handle Front
Cover the front of the mirror’s handle with duct tape. Smooth out any bubbles or wrinkles as you go.
Step Four: Prepare for Curved Edges
Using your scissors, cut small slits into the overlapping duct tape around every curved area of the mirror. For general coverage, you can cut slits about 1 inch apart along the entire outer edge of the tape.
Step Five: Secure the Edges
Gently wrap the small duct tape tabs you’ve just cut around the edges of the mirror and the handle. Smooth them down meticulously to eliminate any creases, wrinkles, or air bubbles, ensuring a clean and secure finish.
How To Make The Decorative Fringe (Optional):
Step One: Create the Fringe Strip
First, cut a strip of duct tape to your desired length. Fold this strip lengthwise (the long way), but intentionally leave about 1/2 inch of the sticky part exposed along one edge.
Step Two: Cut the Fringe
Using your scissors, cut small, even slits into the folded side of the duct tape. Make sure to cut all the way up to the edge of the fold, but be careful not to cut into the exposed sticky part of the tape.
Step Three: Apply the Fringe
Using the exposed sticky part of the fringe strip, apply it along the outer edge of your mirror. The “give” created by the fringing technique makes these pieces surprisingly flexible, allowing them to easily conform to the curved shape of the mirror.

5. DIY Disney BB-8 Shirt: A Galaxy Far, Far Away

With the enduring popularity of Star Wars now firmly part of the Disney universe, showing off your love for the galaxy far, far away is easier than ever! This DIY BB-8 shirt is a fantastic project for any fan of the lovable astromech droid. It’s incredibly simple to make, yet yields a professional-looking result that’s perfect for a day at Hollywood Studios or just lounging at home. Get all the details and the template at DesertChica.com.
What You Will Need for Your Disney BB-8 Shirt
- A solid color shirt (white or light colors generally work best with iron-on transfers)
- Iron On Transfer Paper (ensure it’s compatible with your printer and fabric)
- BB-8 Shirt Template (Click here to download the design)
- A household Iron
Step One: Follow the Transfer Paper Instructions
This project is wonderfully straightforward! The main step involves accurately following the instructions provided with your iron-on transfer paper. Typically, this includes printing the BB-8 template onto the transfer paper (often requiring a mirrored image print setting), cutting out the design, positioning it on your shirt, and then carefully ironing it on according to the specific heat and time recommendations for your transfer paper. Once ironed, allow it to cool, peel off the backing, and your custom BB-8 shirt will be complete!
6. DIY Disney Trip Countdown Tracker: Build the Excitement!
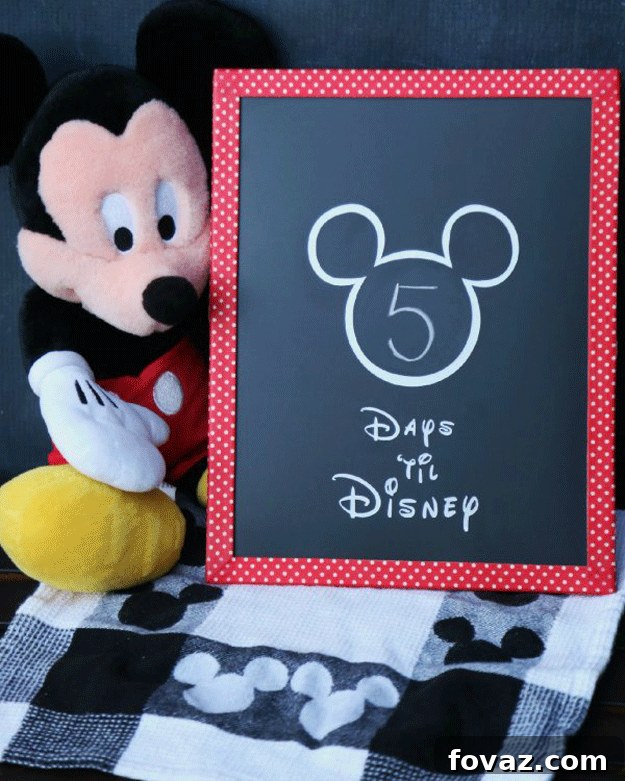
While not a wearable item, a Disney trip countdown tracker is an absolute essential for building anticipation, especially for impatient kids (and adults!). This adorable chalkboard countdown allows you to visually track the days until your magical vacation, making the wait even more exciting. It’s a craft that fosters family engagement and keeps everyone focused on the upcoming adventure. Find the complete guide at MomEndeavors.com.
What You Will Need To Make Your DIY Disney Countdown
- A framed chalkboard (a 5×7 inch one from a craft store like JoAnn works perfectly)
- Disney-inspired washi tape (explore options like this Disney washi 4-pack or this Disney washi 3-pack with polka dots on Amazon)
- Sharp Scissors
- Vinyl & an electronic cutting machine (such as a Silhouette or Cricut Explore) – OR – silver paint pens & a paper template
- Chalk
- Glue or adhesive (*optional, for extra secure washi tape)
Step One: Decorate the Frame with Washi Tape
Choose your favorite Disney-themed washi tape and carefully apply it to the frame of your chalkboard. Overlap the edges neatly to create a continuous, decorative border. For extra security, you can use a dab of glue or adhesive at the ends of the tape.
Step Two: Prepare Your Template
If you’re using an electronic cutting machine like a Cricut or Silhouette, design or download a Disney font template for phrases like “Days Until Disney.” If you don’t have a machine, print out your chosen text on paper to create a stencil you can trace by hand.
Step Three: Apply or Trace Your Design
If using a cutting machine, cut your design from vinyl and apply it precisely to the chalkboard surface. If working manually, place your paper template on the chalkboard and carefully trace the letters using a silver paint pen for a clean, permanent look. (You can easily find templates for official Disney fonts online to maintain an authentic feel.)
That’s all there is to it! Now, simply use a piece of chalk to update the countdown daily. Place your new Disney countdown tracker in a prominent spot where everyone in the family can see and enjoy the growing excitement. Believe us, the kids will be checking it constantly!
We truly hope these creative ideas have filled you with Disney cheer and inspired you to make some magic of your own!
Discover More Disney-Inspired & Creative Projects:
-
18 Enchanting DIY Disney Costumes for All Ages
-
Dreamy Disney Room Decor Ideas for Every Fan
-
21 Awesome DIY Lego Project Ideas for Creative Minds