
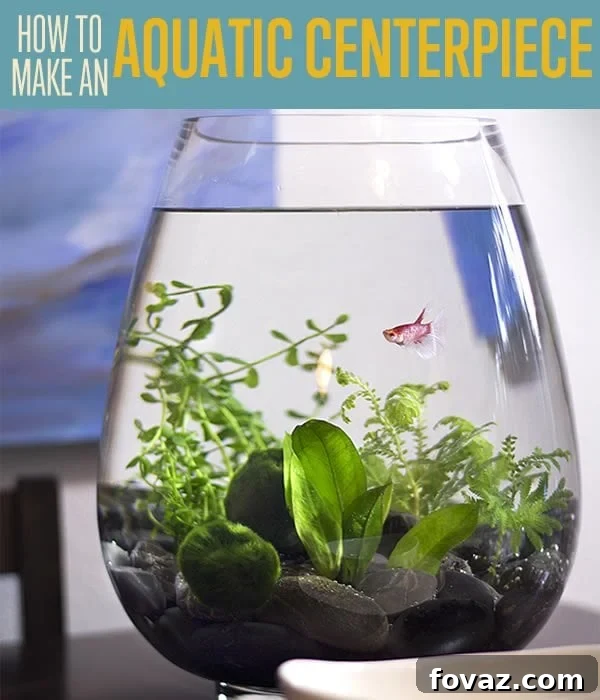
DIY Aquatic Terrarium: Craft a Mesmerizing Table Centerpiece
Transform your next dinner party or bring a touch of serene nature into your home with a captivating DIY aquatic terrarium. This unique centerpiece, also known as a desktop aquarium or planted vase, is not only a stunning focal point but also surprisingly simple to create. Imagine your guests mesmerized by the tranquil dance of a Betta fish amidst lush aquatic plants and elegant riverbed textures. Best of all, you can bring this project to life in less than an hour, often with supplies found affordably. Say goodbye to dull decor and embrace the beauty of a living, breathing artwork. Dive into our comprehensive guide to learn how to craft your very own aquatic haven!
Why an Aquatic Terrarium is the Perfect DIY Project
Beyond its aesthetic appeal, a DIY aquatic terrarium offers numerous benefits. It’s an accessible entry point into the world of aquascaping, requiring minimal space and maintenance compared to a full-sized aquarium. For those seeking a unique home decor piece, this project provides a blend of modern design and organic tranquility. The gentle movement of a Betta fish, combined with the subtle sway of Marimo balls and plants, creates a calming visual effect perfect for de-stressing after a long day. It’s a conversation starter, a living art piece, and a testament to your creativity. Moreover, creating something with your own hands brings immense satisfaction, and this project is designed to be enjoyable and rewarding for crafters of all skill levels.
Gather Your Supplies: Everything You Need for Your Aquatic Oasis
Embarking on your aquatic terrarium journey begins with gathering the right materials. We’ve curated a list that balances beauty, functionality, and affordability. Remember, a little creativity in sourcing can go a long way!
-
Large Glass Vase
The foundation of your aquatic terrarium. Look for a vase that offers a clear view into your miniature ecosystem. While budget-friendly options can be found at thrift stores like Goodwill, consider the aesthetic you’re aiming for. Modern, clean-edged vases can elevate the overall look. Craft stores like Michael’s often have a wide selection, and don’t forget to utilize coupons or store apps for significant savings. A vase with a wide opening will make arrangement and maintenance much easier.
-
Smooth Decorative Stones
These stones will form the base layer and provide a natural, riverbed-like aesthetic. Dollar Tree is an excellent source for these, offering various colors. Darker stones tend to create a striking contrast with green plants and vibrant fish. Plan on purchasing 2-3 bags to ensure you have enough to create a substantial and visually appealing base layer.
-
Aquarium Gravel
Crucial for anchoring your aquatic plants and providing a substrate for beneficial bacteria. Choose a small bag of gravel that closely matches the color of your decorative stones for a cohesive look. Petsmart or your local pet supply store will have a good selection. Ensure it’s specifically designed for aquariums to avoid introducing harmful chemicals.
-
Aquatic Plants
These living elements are essential for a thriving terrarium, providing oxygen, shelter for your fish, and a natural aesthetic. When selecting plants, consider varieties that are suitable for small, low-tech setups. Popular choices include Anubias, Java Fern, Anacharis, and various mosses. Opt for 3-4 plants of varying heights and textures to create visual depth and interest. Ensure they are healthy and free from pests. Your local pet store, like Petsmart, will typically carry a selection of potted aquatic plants.
-
CO2 Booster Plant Supplement (Optional)
If your terrarium won’t receive ample natural sunlight, a CO2 booster can significantly enhance plant growth and vibrancy. This supplement provides essential carbon dioxide, a key nutrient for photosynthesis, helping your plants remain lush and green. Always follow the product’s instructions for dosage to ensure optimal plant health without harming your Betta.
-
Marimo Moss Balls
These unique, velvety green spheres are a delightful addition to any aquatic setup. Marimo balls are actually a rare form of spherical algae, known for their low maintenance and ability to clean water. They drift charmingly around the vase and add a distinctive organic touch. While they might seem a bit pricey at around $8 each, their charm and longevity make them a worthwhile investment. Petsmart typically stocks them near the Betta fish section.
-
Betta Food
Essential for your new aquatic companion. Betta fish have specific dietary needs; choose a high-quality Betta pellet or flake food. A small container will last a long time.
-
Betta Bowl Plus Water Purifying Drops
This is a non-negotiable item! Tap water contains chlorine and chloramines, which are highly toxic to fish. Water purifying drops (also known as water conditioner or dechlorinator) instantly neutralize these harmful chemicals, making the water safe for your Betta. Do not skip this step, as failing to treat the water will almost certainly result in your fish becoming ill or dying.
-
Fish Net
A small fish net is incredibly useful for gentle handling of your Betta during water changes and for skimming any loose plant debris or uneaten food from the water surface. They are inexpensive and a valuable tool for maintaining a clean and healthy environment.
-
A Betta Fish
The star of your aquatic terrarium! Betta fish, also known as Siamese fighting fish, are renowned for their stunning colors, flowing fins, and curious personalities. They are relatively hardy and can thrive in appropriate small environments, making them ideal for this project. Take your time at the pet store to choose a healthy, vibrant fish. Look for active Bettas with bright colors and intact fins. Remember to select your fish last to minimize stress during transit.
Step-by-Step Guide: Crafting Your Aquatic Terrarium
With all your supplies gathered, it’s time to bring your vision to life. Follow these steps carefully to ensure a beautiful and healthy environment for your new aquatic friend.
Step 1: Lay the Foundation with Decorative Stones
Begin by carefully placing your smooth decorative stones at the bottom of your glass vase. Arrange them to create a single, even layer that completely covers the base and gently slopes up the sides, forming a shallow, bowl-like depression in the center. This concave shape is crucial for the next step, as it will cradle the aquarium gravel and prevent it from shifting against the glass, maintaining a clean aesthetic.
Step 2: Add Aquarium Gravel for Plant Anchorage
Once your stone bowl is formed, gently pour the aquarium gravel into the central depression. This gravel layer is where your aquatic plants will root, providing stability and essential nutrients. Ensure the gravel remains nestled within the decorative stones, away from the glass sides. This technique not only hides the less attractive gravel but also creates a more professional and natural look for your terrarium.
Step 3: Prepare Your Aquatic Plants
Carefully remove your aquatic plants from their containers. Most potted aquarium plants come with their roots encased in a protective gel or rock wool. Use scissors to cut open the bottom of the plant pots, making it easier to extract the plants without damaging their delicate root systems.
Step 4: Rinse Plant Roots Thoroughly
After extracting the plants, it’s vital to gently wash away all traces of the packing gel or rock wool from their roots. This material can decompose in your terrarium, potentially fouling the water or introducing unwanted substances. Hold the roots under a slow stream of lukewarm tap water and carefully tease them apart until they are clean and free of residue.
Step 5: Position Your Plants
Now, it’s time to arrange your aquatic plants within the gravel bed. Gently push the roots of each plant into the gravel, ensuring they are firmly anchored. Experiment with spacing and height to create an aesthetically pleasing arrangement. Place taller plants towards the back or center and shorter, bushier plants towards the front for optimal visual impact. Remember, the plants will become more buoyant once water is added, so try to get them as secure as possible.
Step 6: Secure Plant Roots
Without water, your plants might appear somewhat limp or floppy. While placing them, aim to direct the roots straight downward into the gravel. This initial positioning will help them establish themselves properly. Don’t worry if they don’t look perfectly upright yet; the water will help them stand tall. Use your fingers or a long-handled tool to gently nudge the roots deeper into the substrate.
Step 7: Fill the Vase with Water
Slowly and carefully fill your vase with room temperature tap water. To avoid disturbing your carefully placed gravel and plants, you can place a small plate or your hand on top of the substrate and pour water onto it. This disperses the water flow, preventing dislodged elements. Filling it slowly also allows you to observe any shifting and make minor adjustments.
Step 8: Skim the Water Surface
After the vase is filled, you might notice small bits of plant material, gravel dust, or other debris floating on the surface. Use your fish net to gently skim these particles away. A clean water surface is not only visually appealing but also ensures better gas exchange for your fish and plants.
Step 9: Introduce Marimo Moss Balls
Carefully drop your Marimo moss balls into the vase. They will initially sink, but over time, they may periodically float to the surface due to trapped air or gas produced during photosynthesis. This charming movement is a natural characteristic of Marimo balls. Place them where you feel they best complement your plant arrangement.
Step 10: Condition the Water for Your Betta
This is a critical step for the health and survival of your Betta fish. Read the instructions on your water purifying drops (dechlorinator) carefully and add the appropriate amount to the vase water. Stir gently to ensure it’s evenly distributed. Most brands work almost instantly, neutralizing harmful chlorine and chloramines, making the water safe for aquatic life. Allow a few minutes for the conditioner to fully integrate.
Step 11 (Optional): Add CO2 Booster for Plants
If you opted to use a CO2 Booster for your plants, now is the time to add it. Follow the specific dosage instructions provided on the bottle. This supplement will aid in vigorous plant growth and maintain their vibrant green color, especially in environments with lower natural light.
Step 12: Prepare for Betta Introduction
Before introducing your Betta to its new home, ensure the vase water has reached a stable room temperature, ideally matching the temperature of the water your Betta came in. Sudden temperature changes can shock the fish. If there’s a significant difference, you can float the sealed bag containing your Betta in the vase for about 15-20 minutes to allow for gradual temperature acclimation. This crucial step minimizes stress for your new pet.
Step 13: Welcome Your Betta Fish
Once the water is properly conditioned and temperature-acclimated, it’s time to gently introduce your Betta. Carefully open the bag and slowly pour your Betta, along with its original water, into the vase. Avoid dumping it abruptly. Watch your fish explore its new, tranquil habitat. Congratulations, you’ve just created a stunning, living centerpiece!
Caring for Your Aquatic Terrarium: Maintenance Tips
Maintaining your aquatic terrarium is straightforward, ensuring its beauty and your Betta’s well-being for months to come.
-
Feeding
Feed your Betta 2-3 small pellets once or twice a day. Avoid overfeeding, as uneaten food can decompose and pollute the water. Observe your fish to determine the appropriate amount.
-
Water Changes
Perform a partial water change (about 25-30% of the water volume) weekly or bi-weekly. Gently remove the old water using a small cup or siphon. Always replace it with conditioned, room-temperature tap water. This helps remove nitrates and keeps the water clean.
-
Cleaning
Occasionally, you might notice algae growth on the glass. You can gently wipe it away with a soft cloth or an algae scrubber designed for aquariums. Periodically, use your fish net to remove any floating debris or dying plant leaves.
-
Plant Care
Trim any yellowing or excessively long plant leaves to encourage new growth. Ensure your terrarium receives adequate light, either natural indirect sunlight or a dedicated LED plant light. Marimo balls require occasional gentle squeezing and rolling to maintain their spherical shape and encourage even light exposure.
-
Observation
Regularly observe your Betta for any signs of stress or illness, such as fin clamping, lethargy, or changes in color. A healthy Betta is active and vibrant. Early detection allows for timely intervention.
Conclusion: Enjoy Your Living Masterpiece
Creating your DIY aquatic terrarium is more than just a craft project; it’s an invitation to bring tranquility, natural beauty, and a dash of unique style into your home. This living centerpiece serves as a constant source of wonder, a testament to your creativity, and a calming presence for you and your guests. We hope this detailed guide empowers you to embark on this rewarding journey and enjoy the therapeutic process of designing your own mini-ecosystem. Share your creations with us and inspire others!
Explore More DIY Projects!
We love seeing your creative endeavors and believe in building a vibrant DIY community. Your feedback and engagement help us curate more exciting craft posts like this one.
We encourage you to connect with us and explore more inspiring projects:
- Share your amazing centerpiece projects in the comments below! We’d love the opportunity to feature your craft.
- Sign up for our newsletter to get all the latest DIY updates and awesome craft projects delivered straight to your inbox.
- Interested in becoming a DIY guest contributor? If you’re a talented photographer and a DIY expert, fill out our form and sign up! We’re always looking for passionate individuals to collaborate with.
Pin Your Favorite Projects
Don’t forget to pin your favorite projects to share with friends and family. Happy craft-making!
Related DIY Inspiration:
- Mason Jar Terrarium Ideas
- Cool Projects with Mason Jars
- Creative Dollar Store Crafts