

Unlock your inner craftsman and elevate your home with a stunning, custom-built table that perfectly blends rustic charm with industrial flair. This comprehensive guide will walk you through every step of creating your very own DIY pipe leg table, a project that is not only incredibly rewarding but also surprisingly cost-effective. Whether you envision a robust workbench for your garage, a chic dining table that makes a statement, or a versatile craft station, this tutorial provides all the insights you need to get started.
RELATED: Coastal Distressed End Table Step-By-Step Building Guide
In this detailed guide, you will find:
- Crafting Your Custom DIY Pipe Leg Table
- Essential Tools & Materials for Your Pipe Leg Table
- Step-by-Step Instructions: Building Your Industrial Table
How to Make a DIY Pipe Leg Table: A Comprehensive Guide
Crafting Your Custom DIY Pipe Leg Table
Embrace the unique aesthetic of rustic and industrial design within your living space or workshop. Building your own metal pipe furniture offers an affordable and straightforward path to achieving this popular look. Today, we’re diving deep into the simplicity of constructing a DIY industrial table that’s as functional as it is stylish. This versatile piece can serve as an exceptionally durable workbench in your garage, a sturdy desk for your home office, or even transform into a captivating dining room table with just a little extra refinement.
One of the most appealing aspects of furniture crafted from pipe and wood is its inherent simplicity and robust nature. Many individuals spend thousands of dollars on pre-made tables that boast this design, unaware that they could create a custom piece themselves for a fraction of the cost—often just a couple of hundred dollars in supplies. Imagine the satisfaction of knowing you built a high-quality, personalized piece that perfectly fits your needs and space, all while saving significantly.
For those adept at sourcing materials, the cost can be even lower, allowing for maximum budget efficiency.
Beyond the basic construction, this guide emphasizes crucial safety tips often overlooked in other tutorials, especially if your project involves creating a dining table for your family. We’ll cover everything from material preparation to essential finishing touches, ensuring your new table is not only beautiful and functional but also safe for its intended environment. So, if you’re ready to embark on a fulfilling DIY journey and construct a piece that truly reflects your personal style, read on!
Essential Tools & Materials for Your Pipe Leg Table
Before diving into the construction of your DIY pipe leg table, it’s vital to gather all necessary tools and materials. Proper preparation ensures a smooth and efficient building process. Below is a detailed list of what you’ll need. Remember, while specific recommendations are provided, feel free to adapt certain aspects to fit your personal preferences or local availability.
- Wood Screws: (x1) Box of 2 1/2-inch wood screws. These will be crucial for securely attaching your tabletop boards to the support beams.
- Table Top Boards: (x3) 6ft lengths of 2×12 Douglas fir. Douglas fir is a popular choice for its affordability and workability, but you can choose other types of wood like pine, oak, or reclaimed wood for a different aesthetic.
- Belt Sander: (x1) Essential for achieving a smooth finish, especially if you’re working with rough or reclaimed lumber.
- Basic Drill: (x1) A reliable drill with appropriate bits for your screws and a smaller pilot bit for pre-drilling.
- Black Steel Pipe Threaded Tees: (x2) 1-inch diameter. These connectors are fundamental for creating the H-shaped leg structure.
- Wood Filler: (x1) Elmer’s Carpenter’s Wood Filler Max Stainable (or a similar high-quality, stainable wood filler). Perfect for filling gaps between boards or repairing imperfections.
- Wood Stain or Paint: (x1) Quart of wood stain or paint of your choice. This is where you personalize the look of your table.
- Support Beams: (x3) 30-inch lengths of 2×4 Douglas fir. These beams provide crucial structural integrity to your tabletop.
- Polyurethane Sealer: (x1) Polyurethane scratch-resistant sealer. A vital protective layer that enhances durability and guards against wear and tear.
- Chip Brushes: (x4) These inexpensive, disposable brushes are ideal for applying stain and sealer.
- Paper Towels or Rags: (x1) Roll of paper towels or a collection of throwaway rags for cleaning, wiping stain, and general tidiness.
*Douglas fir is a standard framing lumber widely available and cost-effective. However, you are by no means limited to this wood type. Consider oak for durability, pine for a softer look, or even reclaimed wood for unique character.
Metal Pipes & Hardware (ALL 1-inch diameter for consistency and strength):
- (x8) Threaded iron floor flanges. These are used to attach the pipe legs to the tabletop and to provide stable feet for the table.
- (x4) 24-inch length threaded black steel pipes. These will form the main vertical components of your table legs.
- (x2) 18-inch length threaded black steel pipes. Used as the horizontal connectors between the vertical leg sections, forming the “H” shape.
- (x4) 8-inch length threaded black steel pipes. These shorter sections will connect the floor flanges on the tabletop side to the Tee connectors, allowing for leveling adjustments.
Step-by-Step Instructions: Building Your Industrial Pipe Leg Table
Follow these detailed instructions to construct your robust and stylish DIY pipe leg table. Precision and patience are key to a successful outcome.
Step 1. Prepare Your Supplies and Plan Your Dimensions
Our example table will stand 40 inches high from the floor to the tabletop, measure 6 feet in length, and span 34.5 inches in width. However, one of the greatest advantages of DIY projects is customization! Feel free to adjust these specifications to achieve your desired height, width, and length, making the table perfectly suited for your space. Don’t fret if your initial build seems a bit off; pipe tables are forgiving, allowing for easy adjustments by swapping out pipe sections for longer or shorter ones.
Begin by ensuring all your lumber is cut to your chosen dimensions. If you’re using reclaimed wood, inspect it thoroughly for any structural weaknesses, splinters, or potentially harmful residues. While reclaimed wood offers unique character, safety is paramount, especially if the table will be used for dining. Avoid wood from unknown industrial sources to prevent chemical contamination. Once your lumber is cut and inspected, you’re ready to proceed!
Step 2. Prepare the Table Top Boards
With your tabletop boards cut to size, lay them out on a flat surface, such as the floor. Treat this step like assembling a puzzle; carefully arrange and reposition the boards until you find the edges that align most seamlessly, minimizing any large gaps between them. Douglas fir, while budget-friendly and widely available, can sometimes exhibit slight variations in straightness. Dedicate time to finding the best fit for each board.
Once you have a satisfactory alignment, take note of which side is facing down. This “down” side will actually become the underside of your finished tabletop, where the support beams will be attached. Therefore, ensure that the “prettier,” blemish-free side of your boards is facing the floor now, as this will be the visible surface of your table when it’s complete. This attention to detail early on ensures a professional-looking finish.
Step 3. Secure the Tabletop with Clamps for Precision
To ensure the tabletop remains perfectly aligned and stable while you attach the support beams, large clamps are indispensable. Position your clamps across the arranged tabletop boards, one on each side. Tightly secure the three 2×12 boards together, eliminating any gaps and holding the edges firmly in place. This step is crucial for creating a flat and flush surface, preventing shifts during subsequent drilling and screwing.
While optional, investing in quality large clamps (such as 48-inch clamps, often available for around $18 each at major hardware stores) is highly recommended for any woodworking enthusiast. They provide invaluable assistance, not just for this project but for countless future endeavors, sparing you the need to constantly seek extra hands for support.
Step 4. Laying Out Tabletop Supports for Structural Integrity
With your tabletop clamped securely, it’s time to position the three support beams. Remember, you are still working on the underside of the table. Carefully lay out your three 30-inch 2×4 support pieces perpendicular to the tabletop boards.
For optimal aesthetics and stability, position the first support beam 7 inches back from one end of the table, ensuring a 2-inch gap on either side of the support beam itself. This deliberate placement prevents the supports from being overtly visible once the table is flipped over. The second support beam should be placed at the exact center of the table’s underside, maintaining the same 2-inch gap from the side edges. For our 6-foot table, this means the center beam aligns perfectly with the 36-inch (3-foot) mark. Position the third support beam 7 inches from the opposite end, mirroring the first. This symmetrical arrangement provides balanced support and distributes weight evenly across the tabletop.
Step 5. Drilling and Securing the Support Beams
Once the support beams are precisely laid out and aligned, it’s time to secure them permanently to the tabletop. Using your drill, fitted with a pilot bit (a 1/8th-inch bit is suitable, or any bit slightly narrower than your wood screws to prevent splitting), begin by pre-drilling pilot holes through the support beams into the tabletop boards. This essential step prevents the wood from cracking or splitting, especially important with softer woods like Douglas fir.
To keep the beams from shifting, first drill and drive a single screw into place at each end of the support beam. This acts as a temporary anchor. With the beam now held steady, proceed to drill and drive in the remaining screws. We recommend spacing your screws so that each of the three 2×12 tabletop boards receives four screws per support beam. This means each 2×12 board will be secured by a total of 12 screws (four for each of the three support beams), resulting in a grand total of 36 wood screws used for the entire tabletop assembly. This generous number of fasteners ensures a supremely strong and stable tabletop.
Step 6. Preparing the Metal Pipes: Cleaning and Sealing
With the raw tabletop complete, attention now turns to the metal pipe components. Before assembling the table legs, it’s crucial to prepare the pipes. New black steel pipe parts often come coated in a sticky oil residue from the manufacturing process. This oil serves to protect the metal from rust and aids in cutting, but it can contain trace amounts of lead or other undesirable chemicals. Therefore, especially if your table will be used indoors, around children, or as a dining surface, thorough cleaning is paramount.
Using steel wool and a good liquid soap (like dish soap), meticulously scrub each pipe piece to remove all oil and grime. Rinse thoroughly and dry. For an added layer of safety and a cleaner finish, consider sealing the pipes. You can do this by applying a thin coat of the same polyurethane sealer you’ll use on your tabletop. Simply rub it in with a rag; this creates a sealed barrier, protecting users from potential contaminants and preventing dirty hands. While we opted for a more utilitarian, unsealed finish for our workbench example, sealing is highly recommended for indoor use, particularly for dining tables or children’s furniture. Alternatively, a clear coat spray paint designed for metal can also provide protection and a cleaner feel.
What Is Polyurethane? Polyurethane is a versatile polymer that, in liquid form, acts as a durable, protective coating, similar to varnish. It dries to a hard, resistant finish, making it ideal for sealing wood and metal alike.
Step 7. Creating the Leg Bases
Begin assembling your table legs by taking all four of the 24-inch threaded black steel pipes. For each of these pipes, screw a threaded iron floor flange onto one end. These flanges will eventually be attached to the tabletop. For now, simply hand-tighten each flange onto its pipe. There’s no need to crank them down with excessive force at this stage; slight adjustability will be useful later for leveling.
Step 8. Incorporating the Tee Connectors
Next, take the remaining ends of your four 24-inch pipe sections (the ends without the floor flanges) and screw a 1-inch black steel pipe threaded Tee onto each. The Tee connectors are central to creating the H-shaped leg structure, allowing for the horizontal crossbar. Again, hand-tighten these connections, ensuring they are snug but not overtightened. At this point, you will have four individual leg segments, each consisting of a 24-inch pipe with a floor flange on one end and a Tee connector on the other.
RELATED: Backyard Furniture Projects You Can DIY
Step 9. Adding Horizontal Support to Form ‘L’ Shapes
Now, take your two 18-inch length threaded black steel pipes. These will serve as the crucial horizontal crossbars that connect the vertical legs. Screw one end of each 18-inch pipe into one of the Tee connectors from two of your assembled leg segments. This step will result in two pipe combinations, each resembling an “L” shape. Ensure these connections are securely hand-tightened.
Step 10. Connecting the ‘L’ Shapes to Form a ‘U’
To complete the main frame of each leg, take one of the remaining 24-inch pipes (which currently has only a floor flange and a Tee connector) and screw its Tee connector end into the open end of one of your 18-inch pipes. This will create one half of an H-leg. You’ll need to carefully spin the entire leg assembly to securely attach the other side to the Tee connector of the remaining 24-inch pipe. Once connected, you will have two distinct pipe configurations, each resembling a “U” shape (or a lower-case ‘n’, or even a badly drawn ‘C’—you get the idea!). These “U” shapes represent the foundational structure of your two H-shaped table legs.
Step 11. Finalizing the H-Legs with Adjustable Sections
To complete the H-shaped legs, grab your four 8-inch threaded black steel pipes. Thread one of these 8-inch pipes into the top opening of each Tee connector. These shorter sections will be the points where the legs attach to the tabletop, and their threaded nature allows for crucial leveling adjustments later on. Finally, cap off each 8-inch pipe by screwing on your remaining two threaded iron floor flanges. Once this is done, you will have two complete “H” shaped leg assemblies, ready for attachment to your tabletop. Ensure all components are hand-tightened to a firm but not overly rigid degree.
Step 12. Repeat Assembly for All Legs
Follow steps 7 through 11 until you have successfully assembled all the necessary table legs. For a standard four-legged table, this means creating two complete H-shaped leg structures. If your design requires more legs, simply repeat the process. As with previous steps, ensure that all connections are hand-tightened firmly. Over-tightening at this stage can make future adjustments for leveling more difficult. The goal is a sturdy, yet slightly adjustable, assembly.
Step 13. Attaching the H-Legs to the Underside of the Tabletop
With your H-legs fully assembled, carefully position them on the support beams on the underside of your tabletop. Ensure that the longer (24-inch) pipes are the ones making contact with the table surface, as these are the ones with the flanges designed for attachment. Center each leg assembly carefully, ensuring that the floor flanges on either side are equidistant from the edge of the 2×4 support beams. In our design, this typically means leaving approximately 3 inches of space on either side.
Once the legs are perfectly positioned, use a pencil to mark the locations of the holes on the pipe flanges onto the wood. Alternatively, have a helper hold the pipes firmly in place while you proceed to drill. Using your pilot bit, pre-drill holes at each marked spot to prevent the wood from splitting. Finally, drive your wood screws through the flange holes and into the tabletop, securely attaching the legs to the wood. This step transforms your separate components into a cohesive, stable table structure.
Step 14. Secure All Flanges and Flip the Table
After successfully attaching the first H-leg by securing all four of its flanges to the tabletop, repeat the process for the second H-leg assembly. Ensure all remaining flanges are screwed down tightly and securely into the wood. Once every flange is firmly fastened, double-check all connections for stability. With all four leg flanges secured, the moment of truth arrives: carefully flip the entire table over. You’ll now see your pipe leg table standing on its own, ready for the final adjustments and finishing touches.
Step 15. Leveling the Table for Stability
Upon flipping your table, you might find that it wobbles slightly, either due to uneven pipe tightening, slight variations in your assembly, or an uneven floor. This is a common and easily fixable issue, thanks to the threaded pipe design. To level the table, simply turn the bottom pipe sections (the 24-inch pipes with the floor flanges) until all four flanges sit firmly and evenly on the floor. The threaded nature of the pipes allows for minute adjustments, enabling you to raise or lower each leg independently until your table is perfectly stable and wobble-free. Take your time with this step to ensure a rock-solid foundation.
Step 16. Optional Sanding for a Smooth Finish
The extent of sanding required depends largely on the type of lumber you’ve used. If you’ve opted for new, planed lumber, minimal sanding might suffice. However, if you’re using weathered or reclaimed wood, preparing for extensive sanding is wise to achieve a smooth, splinter-free surface. Even with new wood, sanding down sharp corners is recommended to prevent accidental bumps and create a more inviting feel.
For achieving a baby-bottom smooth finish, sanding can be a time-consuming affair, potentially spanning several hours or even a full day. If your goal is simply to eliminate rough edges and prepare for staining, a quick pass might take as little as 10 minutes. Always sand along the grain of the wood to avoid unsightly cross-grain scratches. For heavy-duty sanding, a belt sander with at least a 3×21-inch belt is highly effective. For general smoothing and rounding edges, a smaller “mouse” sander with a 120-grit sanding disc works wonders. Remember to thoroughly clean off any sawdust, dirty fingerprints, or shoe marks after sanding, as these will become permanent fixtures once stained. Dust particles can also interfere with the stain’s adherence and appearance.
Step 17. Staining or Painting for Personalization
Once your tabletop is smooth and clean, it’s ready for staining or painting. Before applying any finish, use a damp paper towel to wipe down the entire surface. This removes any remaining sawdust or fine particles that could interfere with the staining process, ensuring a clean and even application. Expensive brushes are unnecessary for staining; inexpensive chip brushes, readily available at any hardware store, work perfectly. Gather your chosen stain, gloves to protect your hands, and plenty of clean rags or paper towels for wiping.
Apply thin, even coats of stain with a chip brush, working in manageable sections. Immediately after applying, use a clean rag or paper towel to wipe off any excess stain and clean up any pooling. For a richer, darker hue that highlights the wood grain and knots, allow the stain to sit for about 30 seconds before wiping. Wiping away the excess from the higher surfaces leaves the darker stain absorbed in the grain and knots, creating a beautiful, contrasting effect. For a lighter, more uniform color, wipe immediately after application. Always consult the stain manufacturer’s recommendations for drying times before proceeding to the next step, typically found on the product can.
Step 18. Optional: Filling Gaps and Imperfections
Using new lumber, the primary areas that might benefit from wood filler are the long gaps between each tabletop board. A quality, stainable wood filler can seamlessly bridge these gaps, creating a more uniform surface. If you’re working with reclaimed wood, you might find significantly more imperfections, knots, and cracks that require filling to achieve a truly smooth surface, potentially using substantially more filler than with new lumber.
A common question is whether to fill before or after staining. Filling after staining, as demonstrated here, can create an interesting visual variance, as the filler often takes on a slightly different hue or remains lighter, providing a subtle contrast. If you prefer a more uniform look, fill before staining, ensuring your chosen filler explicitly states it is “stainable” on the label. Allow the filler to dry completely according to manufacturer instructions before moving on.
OPTIONAL. Stain Touch-Up for Filler Residue
After the wood filler has dried and any excess has been carefully scraped or sanded away, you might notice some faint white or “ashy” residue around the edges of the filled areas. This is a common occurrence and an easy fix. To remedy this, take a small amount of your wood stain on a clean rag. Gently rub the rag over the areas exhibiting the white residue. The stain will subtly blend and darken the residue, causing it to disappear into the surrounding wood without significantly affecting the color of the filler within the gaps. This technique helps achieve a clean, polished look around your filled seams.
Step 19. Sealing for Durability and Protection
After allowing your stained wood to dry for the time recommended by the stain manufacturer (which can vary, so always check the can), it’s time to apply several coats of polyurethane sealer. This crucial step creates a thick, protective barrier that will safeguard your wood from scratches, moisture, and general wear and tear, especially vital for a high-traffic item like a workbench or dining table. Chip brushes are once again perfect for this task due to their affordability and disposability.
Apply the polyurethane generously, brushing on a milky-white coat over the entire tabletop. Don’t be alarmed by the milky appearance; it will dry clear. Allow each coat to dry for approximately 30 minutes, or until it’s relatively clear but still slightly tacky. At this point, you can apply the next coat. For normal use, three to four coats are usually sufficient. However, if you anticipate heavy use or plan to really “beat this thing up” (as with a heavy-duty workbench), consider applying seven or eight coats for maximum protection.
If you’re crafting this table for use as a dining surface, it’s imperative to use a food-safe polyurethane sealer. Alternatively, a food-grade “bar top epoxy” offers an exceptionally durable and safe finish, commonly seen in restaurants and bars. For guidance on safe, eco-friendly products, visit a specialized paint store (rather than a large box store) and consult their experts. Once all coats are applied, allow the clearcoat to dry for at least 24 hours before placing anything on the table. In colder temperatures, extend this drying time. Even if it feels dry to the touch, items placed too soon can stick fiercely to the finish, a hard-learned lesson for many DIYers!
Your DIY Pipe Leg Table: Project Complete!
Here’s a video tutorial from homesteadonomics on how to build an industrial stool to match our DIY pipe leg table:
And there you have it—your magnificent, custom-built pipe leg table! This versatile masterpiece is perfect for a variety of settings: a rugged man cave, a dedicated study space for kids, an expansive craft table, a gardener’s potting station, a sophisticated dining room pub table, or practically anywhere else you can imagine. The only true limits are your creativity and the available square footage of your space.
Are you inspired to tackle this DIY pipe leg table project this weekend? Share your plans and ideas for how you’ll use it in the comments section below!
Up Next:
- 687 DIY Outdoor Projects | The Ultimate List
- 22 Easy Woodworking Projects You Must Try
- How to Make a Macrame Lawn Chair | DIY Projects
Stay connected with us for more inspiring DIY projects and tips on Facebook, Twitter, Pinterest, and Instagram!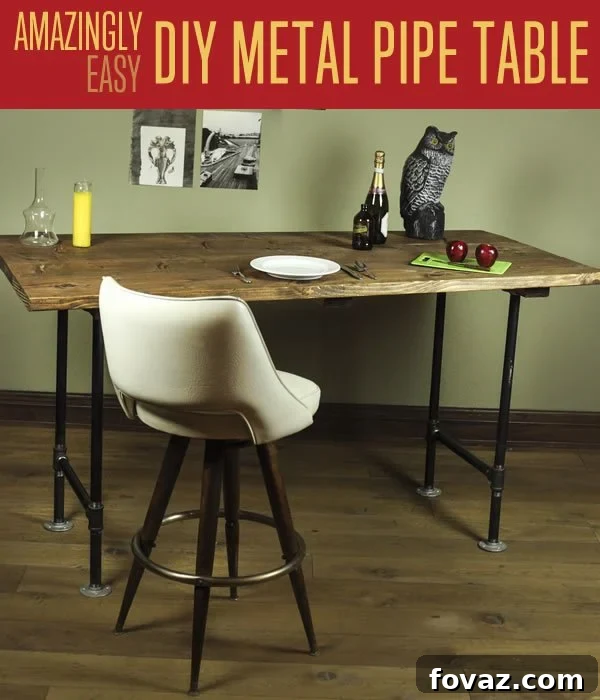 Editor’s Note: This post was originally published on May 4, 2014, and has been updated for quality, relevancy, and comprehensiveness.