
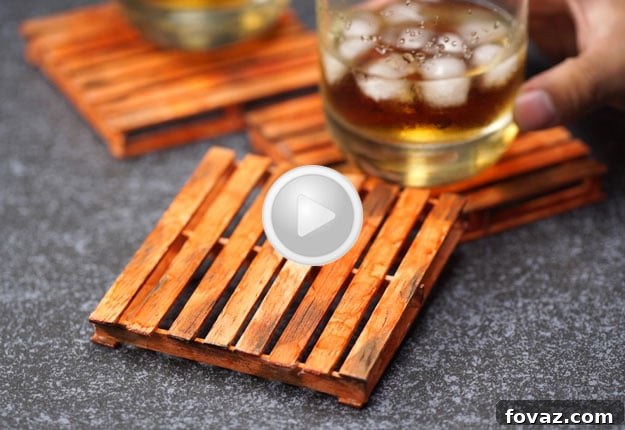
Dive into the satisfying world of DIY crafting with a project that’s both incredibly simple and remarkably rewarding: crafting your own mini pallet coasters from humble popsicle sticks. These charming coasters not only protect your surfaces with rustic elegance but also serve as a testament to the power of imagination and a few basic supplies. Perfect for beginners and seasoned crafters alike, this guide will walk you through transforming ordinary craft sticks into functional pieces of home decor that look far more expensive than they truly are. Get ready to add a touch of handcrafted warmth to your living space!
Craft Charming Mini Pallet Coasters from Popsicle Sticks: The Ultimate DIY Guide
In an age where personalized touches make a house feel like a home, embarking on a do-it-yourself (DIY) project offers an unparalleled sense of accomplishment. While some crafts might seem intimidating, requiring specialized tools or complex techniques, many of the most delightful creations begin with the simplest of materials. For those eager to explore their creative side without breaking the bank, or for anyone looking for a quick and impactful home decor upgrade, crafting mini pallet coasters from popsicle sticks is an absolute game-changer. This project is a fantastic entry point into woodworking for beginners, offering a chance to learn basic construction and finishing techniques with minimal investment.
Imagine sipping your favorite beverage, resting your mug or glass on a beautifully handcrafted coaster that you made yourself. Beyond their primary function of protecting your tables from unsightly rings and spills, these mini pallet coasters add a unique, rustic charm to any room. They are incredibly versatile, fitting seamlessly into various decor styles, from farmhouse chic to industrial minimalist. Furthermore, they make thoughtful, personalized gifts for friends and family, demonstrating care and creativity. Let’s gather our budget-friendly supplies and embark on this enjoyable journey to create something truly special.
Why Choose DIY Popsicle Stick Coasters?
There are countless reasons why this particular DIY project stands out:
- Budget-Friendly: Popsicle sticks are one of the cheapest craft supplies available, making this an incredibly economical project.
- Simplicity: The steps are straightforward, requiring no advanced crafting skills or power tools, making it accessible for all ages (with adult supervision for cutting and hot glue).
- Customization: From stains and varnishes to paints and embellishments, the finishing possibilities are endless, allowing you to tailor them to your personal style.
- Eco-Friendly: Repurposing popsicle sticks (or buying new ones for crafts) is a sustainable way to create useful items and reduce waste.
- Quick to Make: Excluding drying times, a single coaster can be assembled in minutes, perfect for spontaneous crafting sessions or making a batch for gifts.
- Practicality: Coasters are everyday essentials, making this a functional craft that you’ll use regularly.
What You Need to Craft Your Mini Pallet Coasters:
Gathering your materials is the first exciting step. You’ll be surprised how few items are needed to bring these charming coasters to life. For each individual coaster, you will need:
- 13 Popsicle Sticks: Standard craft sticks work best. Ensure they are clean and free of any residue. These form the building blocks of your mini pallet.
- Sharp Scissors or Craft Knife: Essential for precisely cutting the sticks. A craft knife can offer cleaner cuts but requires more caution.
- Hot Glue Gun and Glue Sticks: Your primary adhesive. Hot glue provides a strong, fast-drying bond, which is crucial for quick assembly.
- Wood Varnish (Clear): This protective layer seals the wood, enhancing its durability and guarding against moisture, ensuring your coasters last.
- Wood Stain (Optional, but recommended for rustic look): Used to give your coasters an aged, rustic, or customized color finish. Choose a color that complements your home decor.
- Small Paintbrush: For applying both the varnish and the stain evenly. You might want separate brushes for each to avoid color mixing.
- Paper Towels or Lint-Free Cloth: Ideal for rubbing in wood stain to achieve a nuanced, rustic effect, and for cleaning up any excess.
- Protective Surface (e.g., old newspaper, cardboard): To shield your workspace from glue, varnish, and stain.
- Ruler or Measuring Tape (Optional, but helpful): For ensuring precise and uniform cuts, leading to a more polished final product.
- Fine-Grit Sandpaper (Optional): To smooth out any rough edges after cutting or before finishing, for a truly professional feel.
Step-by-Step Guide to Crafting Your Mini Pallet Coasters:
Follow these detailed instructions to transform your simple craft sticks into delightful mini pallet coasters.
Step 1: Prepare and Trim Your Popsicle Sticks
The foundation of a well-made coaster lies in uniformity. Begin by preparing all 13 popsicle sticks. Using your sharp scissors or a craft knife (exercise extreme caution if using a knife), carefully cut off the rounded edges from both ends of each popsicle stick. The goal is to transform them into perfectly rectangular pieces. This step is crucial for achieving that authentic “pallet” look where all pieces fit snugly together. Aim for consistency in length for all sticks. If you have a ruler, you can measure and mark your desired length before cutting to ensure precision. After cutting, you might notice some rough edges; gently sand these with fine-grit sandpaper for a smoother, more professional finish, preventing splinters and allowing for better adhesion later.
Step 2: Apply a Protective Wood Varnish
Once your sticks are cut and smoothed, it’s time to protect them. Lay out your rectangular popsicle sticks on a protective surface. Using your paintbrush, apply a thin, even coat of wood varnish to all sides of each stick. Varnish serves several vital purposes: it seals the wood, protects it from moisture (a coaster’s primary enemy!), enhances the natural wood grain, and provides a durable finish. Ensure you cover all surfaces thoroughly. Allow the varnish to dry completely according to the manufacturer’s instructions. This might take a few hours. For added durability, you can apply a second thin coat after the first has dried, ensuring each layer is fully cured before the next application.
Step 3: Construct the Mini Pallet Base
Now for the exciting part: assembly! For the base of your coaster, select two of your varnished and dried popsicle sticks. These will serve as the parallel supports for your pallet. Lay them flat on your workspace, parallel to each other, about 1 to 1.5 inches apart. Next, take three more popsicle sticks. These will be glued perpendicularly onto the two base sticks, creating the initial pallet structure. Apply a small amount of hot glue to the ends of one of these three sticks and carefully press it across the two base sticks at one end. Repeat this for the second stick at the opposite end, ensuring it’s parallel to the first. Finally, glue the third stick centrally between the first two. Make sure these three sticks are glued on their side (the narrower edge) for an authentic pallet look. Allow the glue to set for a minute or two, ensuring a sturdy base.
Step 4: Complete the Pallet Top
With your base structure securely formed, it’s time to add the top planks of your mini pallet. Take the remaining eight popsicle sticks. These will be laid flat across the three perpendicular support sticks you just glued. Starting from one end, apply a thin line of hot glue to the three support sticks where the first top plank will rest. Carefully press the first popsicle stick onto the glue, ensuring it’s straight and flush with the edge. Continue this process, gluing the remaining seven sticks, one by one, ensuring an even and consistent gap between each “plank” for that realistic pallet aesthetic. Take your time to align them perfectly. Once all eight sticks are glued in place, gently press down on the entire structure to ensure all bonds are firm. Allow the glue to cool and solidify completely before proceeding.
Step 5: Apply Wood Stain for a Rustic Finish
This step adds character and depth to your coaster. With a clean paintbrush or a fresh piece of paper towel, apply a small amount of wood stain to various parts of your assembled coaster. Instead of covering the entire surface, focus on edges, corners, and random spots to mimic the natural wear and tear of a real pallet. Immediately after applying, use a clean paper towel to rub the stain into the wood. This technique allows for better control over the intensity of the color and helps create a beautiful, subtly aged, or distressed look. You can build up layers of stain for a darker finish or leave some areas lighter for more contrast. Experiment with different colors of stain to match your decor – dark walnut for a classic look, or a lighter oak for a sun-bleached effect. Once satisfied, let the stain dry thoroughly in a well-ventilated area, which can take several hours or even overnight, depending on the product.
Step 6: Enjoy Your Handcrafted Coasters!
Congratulations! Your charming mini pallet coaster(s) are now complete and ready for action. Place them on your coffee table, bedside stand, or desk, and proudly rest your favorite beverages on them. Not only will they protect your furniture from unsightly rings and spills, but they’ll also serve as a delightful conversation starter and a constant reminder of your crafting prowess. Remember, these coasters are easy to clean with a damp cloth; avoid submerging them in water. Consider making a set of four or six to complete your collection or to give away as thoughtful, handmade gifts.
Tips for Success and Customization:
- Precision Matters: While the project is forgiving, precise cuts and even spacing will significantly enhance the final aesthetic of your coasters. Use a ruler to guide your cuts and spacing for a professional look.
- Don’t Over-Glue: A little hot glue goes a long way. Excessive glue can ooze out and create unsightly messes. Apply small, controlled dots or thin lines.
- Experiment with Finishes: Beyond wood stain, consider painting your coasters with acrylic paints for a pop of color, or try a dry-brush technique for a distressed look. You could even use decoupage medium to adhere small fabric scraps or decorative paper.
- Personalize Them: Add a small initial, a simple stencil, or a hand-drawn design to make each coaster truly unique. These make fantastic personalized gifts!
- Consider Alternative Adhesives: While hot glue is fast, wood glue offers an even stronger bond if you’re willing to wait for drying time and use clamps.
- Batch Production: If you’re making multiple coasters, set up an assembly line. Cut all sticks, then varnish all sticks, then assemble all bases, and so on. This makes the process more efficient.
Troubleshooting Common Issues:
- Uneven Cuts: If your sticks are slightly different lengths, try to arrange them strategically so the inconsistencies are less noticeable, or trim them again for uniformity.
- Glue Showing: If hot glue oozes out, wait for it to cool completely, then gently peel or trim away the excess with a craft knife.
- Patchy Stain: Ensure your wood is clean and free of oils or wax before staining. Apply stain evenly and rub it in quickly. If it still looks patchy, apply a second thin layer.
- Coasters Warping: Ensure your wood varnish is applied evenly and completely covers all surfaces to prevent moisture absorption on one side, which can lead to warping. Allow adequate drying time between coats and before use.
Embarking on DIY projects like these mini pallet coasters is more than just creating an object; it’s about nurturing creativity, developing new skills, and adding a personal touch to your surroundings. The simplicity of this craft makes it an ideal project for crafters of all skill levels, promising a beautiful and functional outcome. So, gather your materials, clear your workspace, and get ready to transform humble popsicle sticks into charming and durable coasters that will elevate your home decor.
Watch the video, and share with your friends on Facebook!
Want more fun DIY ideas to try? Check out more of our posts:
How to Make DIY Vintage Map Coasters
20 Boozy Drinks to Start the Year | Best Alcoholic Drinks
18 Ingenious DIY Projects to Make in Under an Hour