
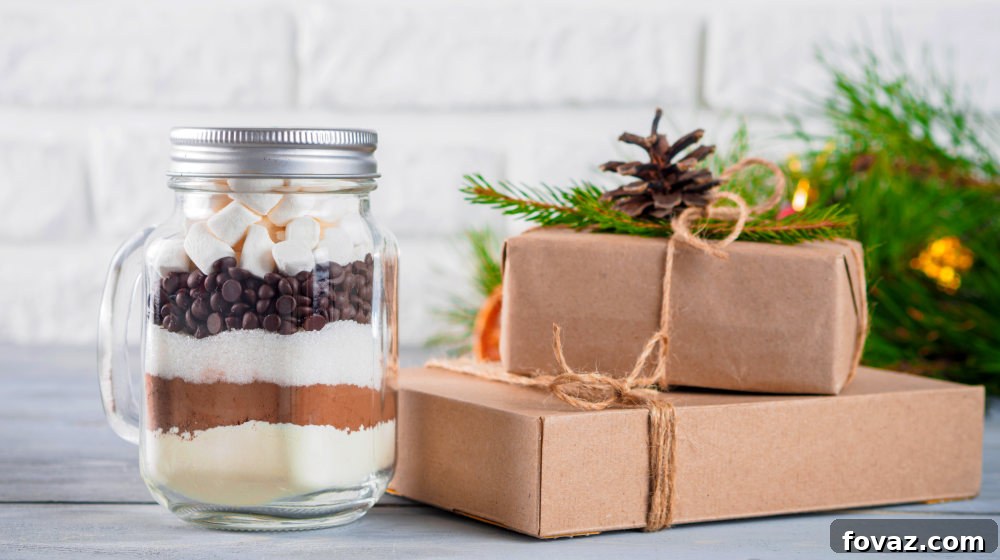
Unlock the secret to crafting delightful homemade gifts by learning how to transform simple hot chocolate mix into an exquisite, giftable kit. Perfect for friends, family, and colleagues, these kits are a heartfelt way to share warmth and comfort, especially during the colder months or holiday season.
RELATED: How to Make Hot Chocolate Boozier & Better
In this comprehensive guide, you will discover:
- The Allure of an Artisan Hot Cocoa Kit
- Gathering Your Gourmet Hot Chocolate Ingredients
- Step-by-Step Assembly of Your Hot Cocoa Jar
- Tips for Enhancing Your Hot Cocoa Experience
- The Joy of Gifting Homemade Hot Chocolate
Create the Ultimate DIY Artisan Hot Chocolate Gift Kit
There’s something uniquely special about a homemade gift. It conveys thoughtfulness, effort, and a personal touch that store-bought items often lack. If you’re searching for an excellent holiday gift, a charming hostess present, or simply a fun and engaging project for the kids, consider crafting a gourmet hot chocolate kit in a jar. This delightful creation is guaranteed to bring smiles and warm hearts, making it an instant favorite among your loved ones.
Imagine the cozy comfort of a rich, decadent cup of hot cocoa on a chilly evening. Now, imagine that experience elevated by unique, artisan flavors, all presented in a beautifully layered jar. This DIY hot cocoa jar is not just a drink mix; it’s an invitation to a moment of blissful indulgence. It’s an awesome holiday DIY – incredibly easy to assemble and offers endless fun for everyone involved, from crafting to enjoying.
While the holiday season is synonymous with warming up to a sweet cup of hot cocoa, the same old plain chocolate drink can sometimes feel a bit ordinary. This homemade hot chocolate kit aims to transform that everyday treat into an extraordinary experience. Inspired by my family’s favorite blend, this recipe is designed to become a new tradition in your home, offering a sophisticated twist on a beloved classic.
What sets this kit apart is its “artisan” appeal. We’re moving beyond basic chocolate to incorporate subtle yet impactful notes that elevate the flavor profile. Imagine hints of smoky mezcal, a gentle kick from chipotle, and the rich nuttiness of hazelnut. This unexpected marriage of sweet and spicy flavors creates an incredibly decadent and memorable hot cocoa. It’s a truly gourmet experience that can be brewed up in a matter of minutes, providing a luxurious treat without the fuss.
This exquisite kit makes a fantastic gift for friends, family, teachers, or that special someone who appreciates unique culinary delights. And of course, there’s no rule against treating yourself! Indulge in this quintessential holiday treat yourself and savor every nuanced sip. It’s a simple pleasure made extraordinary, embodying the spirit of comfort and joy.
What is Mezcal? Originating from Mexico, Mezcal is a distilled alcoholic beverage made from any type of agave plant. Its distinct smoky flavor can add a sophisticated depth to various dishes and drinks, including, surprisingly, hot chocolate!
Crafting Your Gourmet Hot Chocolate Kit: Essential Ingredients & Tools
The beauty of this hot chocolate kit lies in its simplicity and the quality of its components. Selecting good quality ingredients will significantly impact the final taste, transforming a regular drink into a truly gourmet experience. Here’s a detailed list of what you’ll need to assemble your artisan hot cocoa jars:
- 1 1/2 cups Unsweetened Cocoa Powder: Opt for a high-quality cocoa powder. Dutch-processed cocoa tends to be darker and milder, while natural cocoa is fruitier and more acidic. Either works, but a good quality cocoa will ensure a rich chocolate flavor.
- 2 cups Granulated Sugar: This provides the primary sweetness. You can adjust slightly based on your preference for sweetness, but this amount creates a balanced flavor when mixed with the cocoa.
- 3 cups Powdered Milk (Dry Milk Powder): Essential for achieving a creamy, rich texture when the hot chocolate is prepared with water. It dissolves easily and contributes to a velvety mouthfeel.
- 1/4 tsp Ground Cinnamon: A touch of cinnamon beautifully complements chocolate, adding warmth and a subtle spice. Ensure it’s fresh for the best aroma and flavor.
- 1/4 tsp Fine Sea Salt: Salt is a flavor enhancer, balancing the sweetness and deepening the chocolate notes. Don’t skip this small but mighty ingredient!
- 1 1/2 cups High-Quality Chocolate Chips: These add an extra layer of chocolatey goodness and melt beautifully into the drink. Consider using a mix of milk chocolate and dark chocolate chips for complexity, or even white chocolate chips for a different visual and flavor profile.
- 1 1/2 cups Mini Marshmallows: The classic hot chocolate topping! Mini marshmallows are perfect for layering in the jar and melt wonderfully into a frothy topping. Ensure they are fresh and fluffy.
- Accurate Measuring Cups and Spoons: Precision is key in baking and mixing, ensuring consistent results for each kit.
- Glass Jar with Lid (e.g., Mason Jar): A wide-mouth quart-sized (32 oz) mason jar is ideal for its capacity and classic aesthetic. Ensure the jar is clean, dry, and has a tight-fitting lid to keep the ingredients fresh.
Consider the quality of each ingredient as it will directly contribute to the rich flavor profile of your artisan hot cocoa. Using fresh spices and good quality chocolate makes a noticeable difference, transforming a simple mix into a truly gourmet experience.
Step-by-Step Guide: Assembling Your Perfect Hot Chocolate Jar
Creating these beautiful hot chocolate kits is a simple and enjoyable process. The key is in the layering, which not only looks stunning but also helps the recipient understand the components of their delicious drink. Follow these steps for perfectly assembled hot cocoa jars.
Step 1: Gather and Measure All Ingredients with Precision
Before you begin layering, it’s crucial to prepare all your components. Start by accurately measuring each ingredient according to the list above. Place each measured ingredient into separate bowls. This practice serves several important purposes: it ensures that you have the correct quantities, prevents mistakes during assembly, and streamlines the layering process, allowing for a cleaner and more organized workspace.
Having all your ingredients neatly laid out in separate bowls makes the assembly process smooth and efficient. You’ll be able to see everything clearly, making it easy to create distinct, beautiful layers in your jar without any last-minute scrambling.
Step 2: Master the Art of Layering Your Ingredients
This is where the magic happens and your hot chocolate kit transforms into a visually appealing gift. Starting with your densest powdered ingredients first, carefully begin filling your glass jar. The goal is to create distinct, visible layers that are both aesthetically pleasing and practical for keeping ingredients separate until mixed.
Here’s the recommended layering order:
- Cocoa Powder: Start with the cocoa powder at the bottom. Its dark color provides a strong base layer. Use a spoon or a small funnel to gently pour it in, minimizing dust.
- Granulated Sugar: Next, carefully add the granulated sugar. Its lighter color will create a lovely contrast against the cocoa.
- Powdered Milk: Follow with the powdered milk. This layer will appear bright and fluffy, adding another distinct visual element.
- Cinnamon and Salt: These can be gently sprinkled on top of the powdered milk or mixed with it if you prefer not to have a separate tiny layer. Their quantity is small, so they will integrate well.
- Chocolate Chips: After you’ve added all your powdered ingredients, create a generous layer of chocolate chips. This layer is often the most appealing visually, promising rich chocolatey goodness. Gently tap the jar on your counter a few times to settle the powdered layers and create a flatter surface for the chips.
- Mini Marshmallows: Lastly, delicately place a generous layer of mini marshmallows on top. These fluffy clouds are the perfect finishing touch, indicating the luxurious treat awaiting the recipient.
Once all ingredients are carefully layered, your jar is ready to be closed, decorated, and labeled. The distinct layers not only look fantastic but also serve as a promise of the delightful flavors within.
RELATED: 10 Fall-Inspired Mason Jar Cookie Recipes
Step 3: Personalize, Decorate, and Label Your Hot Cocoa Kit
With all your ingredients beautifully layered in the jar, it’s time to add your personal touch. Securely close the lid of your glass jar. Now, let your creativity shine as you choose to decorate it any way you wish. This is where your gift truly becomes unique and reflects your thoughtfulness.
Consider using festive ribbons, colorful twine, a small piece of fabric, or tissue paper to adorn the lid. You can attach a miniature whisk, a cute spoon, or even a candy cane for an extra festive touch. The possibilities are endless – think about the recipient’s favorite colors or the theme of the occasion.
Next, and perhaps most importantly, create a clear and attractive label. On this label, write down all the ingredients (especially important for allergy awareness) and clear, step-by-step instructions on how to prepare the hot chocolate. Don’t forget to tie or affix this label securely around your jar. A beautifully designed label not only provides essential information but also enhances the overall presentation, making your gift perfect!
Here’s an example of what to include on your label:
Artisan Hot Cocoa Mix
Ingredients: Unsweetened Cocoa Powder, Granulated Sugar, Powdered Milk, Ground Cinnamon, Sea Salt, Chocolate Chips, Mini Marshmallows.
Preparation Instructions:
1. Pour the entire contents of the jar into a medium saucepan.
2. Add 6-8 cups of milk (or water for a lighter drink).
3. Heat over medium-low heat, stirring constantly, until the chocolate chips are melted and the mixture is hot and frothy. Do not boil.
4. Serve immediately, topped with extra marshmallows or whipped cream if desired. Enjoy!
Craving for another hot chocolate recipe? Learn how to make hot chocolate including white hot chocolate and peanut butter hot chocolate with The Domestic Geek:
Tips for Enhancing Your Hot Cocoa Experience
Once your beautiful hot chocolate kit is gifted (or if you keep one for yourself!), here are some tips to make the brewing and drinking experience even more delightful:
- Brewing Perfection: For the creamiest hot chocolate, always use whole milk or a creamy plant-based alternative. Heat it gently, stirring constantly, to ensure all ingredients dissolve without burning. Avoid boiling the mixture, as this can dull the flavors.
- Flavor Variations: Encourage the recipient to get creative! A hint of peppermint extract, a dash of orange zest, a pinch of cayenne pepper for extra warmth, or even a spoonful of instant coffee can transform the flavor. For an adult twist, suggest adding a shot of Irish cream, Kahlua, or even a small amount of the aforementioned mezcal or spiced rum to the finished drink.
- Serving Suggestions: Elevate the experience with toppings like homemade whipped cream, a sprinkle of chocolate shavings, a drizzle of caramel sauce, or a cinnamon stick stirrer. A large, cozy mug is also essential for the full comfort experience.
- Storage: Advise keeping the sealed jar in a cool, dry place away from direct sunlight. While the dry ingredients have a long shelf life, it’s best to consume the kit within a few months for optimal freshness and flavor.
The Joy of Gifting Homemade Hot Chocolate Kits
In only a few minutes, you’ve learned how to make a charming and thoughtful hot chocolate jar. This simple yet elegant homemade gift is perfect for expressing appreciation, celebrating holidays, or simply sharing a moment of comfort. Whether you gift it to your friends and family or indulge in a mug yourself, these kits are sure to spread cheer and warmth.
When you’re ready to drink, simply follow the instructions on your label. You can pour in some milk or hot water, stir well, and enjoy. Give your favorite hot choco a little twist by adding a hint of peppermint or cinnamon, or experiment with other flavor combinations to suit your mood. Use this infographic if you need a quick recap of hot chocolate variations. Happy Holidays and happy crafting!
Did you enjoy this tutorial on how to make hot chocolate kits for the holidays? Share your creations and thoughts in the comments section below!
Up Next:
- 16 Favorite DIY Christmas Cookies | Best Christmas Cookie Recipes
- 4 Easy Steps To Melt Chocolate For Dipping The Right Way
- 13 Unique Bohemian Gypsy Dreamcatchers Perfect For Homemade Gifts
Stay connected with us on Facebook, Twitter, and Instagram for more inspiring DIY ideas!Editor’s Note: This article was originally published on November 17, 2015, and has been updated for quality and relevancy.